Stuff Sack Pattern Generator

Skill Building Round Bottom Stuff Sack with Cinch Cord

Pattern Generator

stuff sack plan

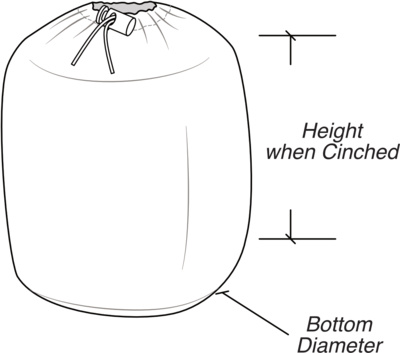
Create custom-sized stuff sacks effortlessly without complex calculations or 3D modeling. Simply input your desired finished 3D stuff sack dimensions, and our generator will calculate precise 2D pattern panels. If this is your very first time sewing, I recommend starting with Cinch Sack as sewing the round bottom of this stuff sack can be challenging for beginners.

stuff sack pattern

Our provided panel dimensions already include the seam allowances and an integrated drawstring Cord Channel allowance of 1.5" (4 cm).
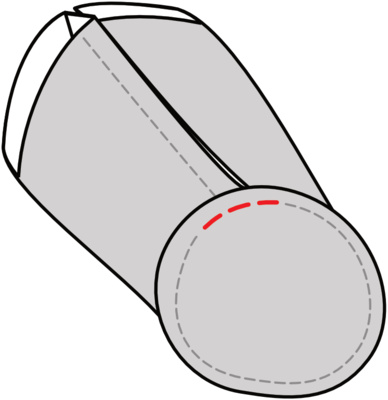
  • Body Panel Length:
  • Body Panel Height:
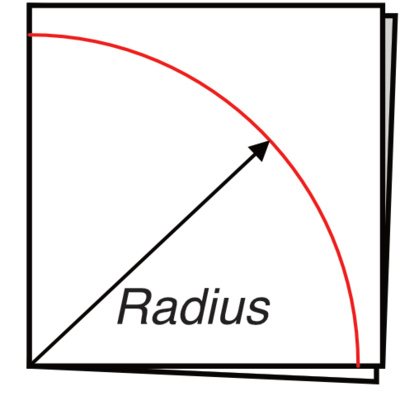
  • Bottom Panel Radius:

For Stuff Sacks with a 6.5 in. (16.5 cm) diameter or less, you can now download a PDF paper pattern generated to the exact Bottom Panel Radius. Give it a try!

Assembly Instructions

Sew Smart, Start Simple: Embark on Your Sewing Adventure

Materials

For guidance on suitable technical fabrics, recommendations, and trusted vendors, refer to our Fabrics Guide. Please note that this is a beginner-friendly project, and it is intended for non-fray technical fabrics. Therefore, seam binding or seam finishing techniques are not included in the instructions.

Materials Links
Lightweight Coated Nylon such as
1.9oz PU Coated Nylon or 2.2oz Hex 70
Ripstop by the Roll logo
Drawstring Cord Ripstop by the Roll logo
Cord Lock Ripstop by the Roll logo
Polyester Thread such as
Gutermann Sew-All or Gutermann MARA 70
Ripstop by the Roll logo
Machine Needles such as
Schmetz Universal size 90/14
Ripstop by the Roll logo

Qualified purchases support LearnMYOG.com at no additional cost to you. See Disclosures for more information.

Ultimate Beginner Guide

From Day 1 to Gear Making Guru
Detailed MYOG Guide and Essential Tools

Zero to Hero Guide
sewist

Bottom Pattern

Pattern

For Stuff Sacks larger than 6.5 inches (16.5 cm) in diameter, follow the next steps to draft a paper pattern by hand. For smaller Stuff Sacks, simply download the paper pattern generated for you above.

  1. For the round Bottom Panel, cut a square piece of paper with a side length larger than input
  2. Fold this square in half, and then in half again making a smaller square.
  3. From the folded corner draw the generated Bottom Panel Radius measurement as shown.
  4. Cut all four paper layers and unfold your perfectly symmetric circle pattern.

Fabric Panels

Pattern

A Based on units selected seam allowance is already included in the pattern. Not seeing measurements? Generate pattern dimensions above.

  1. Cut one Body Panel from your fabric.
    Length: input and Height: input
  2. Cut one Bottom Panel from your fabric.
  3. Cut one drawstring cord. Length:

To enhance clarity, we use light grey to represent the wrong side of the fabric and white to depict the right side in the illustrations. The red dashed line illustrates the seam being sewn.

Cord Channel

Cord Channel corner folds Cord channel stitch line
  1. On the wrong side of Body Panel, mark a line down 1 1/2 in. (4cm) from the topd edge as a guide line for the Cord Channel.
  2. To the wrong side, fold the top corners down to meet the guide line. Finger press to crease.
  3. Fold the remaining top edge down to the guide line.
  4. Sew the fold at 1/8" (3mm) from raw edge to leave ample room for a drawstring.

Sewing the Circle

Joining the round bottom

To achieve clean circles when sewing, it's crucial to maintain precise seam allowances. While my preferred assembly order may seem unorthodox, it has been proven effective in minimizing puckering.

📌 This step is notably challenging, so be patient and take your time. Using a shorter stitch length, about 2-2.5 mm, can aid in sewing smoother curves.

  1. Align the right sides of the fabric together, placing the outer edge of the round Bottom Panel against the edge of the Body Panel opposite the cord channel. Leave approximately 1 inch (25mm) of space from the corner of the Bottom Panel, ensuring enough seam allowance for later closure of the side.
  2. Employ a seam guide to maintain accuracy while sewing. Sew the round Bottom Panel to the Body Panel with a 3/8" seam allowance in a continuous, straight motion. As you stitch, rotate the Bottom Panel to ensure smooth fabric movement through the machine. Proceed at a slow pace, ensuring the edges remain aligned and even throughout the process.
  3. As you near your starting point stop short to avoid stitching over the seam allowance for later closure of the side. This small gap will be closed in later to avoid puckering.

Don't sweat it your first try. Sewing circles takes a lot of patience and practice.

Closing the Side

Sewing the side seamClosing the gap
  1. Because we stitched the circle first, the vertical seam allowances may not meet perfectly together. No worries!
  2. Press your stuff sack flat against the machine table so you can close the side seam.
  3. Being careful not to catch Bottom, sew towards cord channel with a 3/8" seam allowance.
  4. Stop and backstitch once you reach cord channel. Be careful not to sew your cord channel openings shut!
  5. With the side seam closed, inspect the gap in Bottom. If necessary, sew it closed while smoothing the fabric to avoid puckering.

📌 As you become more confident and accurate in your sewing, try sewing the side seam first. Then sew the round Bottom to the Body.

Finishing Up

sample stuff sack
  1. Turn your Stuff Sack right side out!
  2. To reinforce the Cord Channel opening where it meets Body Panel, sew a small bartack about 3/8" long.
  3. Attach a safety pin to one end of the drawstring cord and thread it through the opening in the cord channel.
  4. Once the cord is all the way through, add the cord lock and tie the free ends of the drawstring together to secure.
  5. Your Stuff Sack is now ready to use! Simply pull the drawstring to close the sack and carry your belongings with ease.

👏 Congrats on making your own custom Round Bottom Stuff Sack!

Sewing round bottom stuff sacks is tougher than it appears huh?!
If you want to try an easier style, check out the Cinch Sack!